Saturday 9 November 2013

Traditional Parkin - Mary Berry

I had never tried this cake before until we went to a friend's birthday party and having tasted it I thought it was delicious, moist, sticky, spicy and slightly nutty from the porridge oats.

I had heard it is traditionally baked for bonfire night and decided to try baking it myself using the recipe from my trusty Mary Berry's Baking Bible.

I have to say I was slightly disappointed with the result as the cake was dry and crumbly rather than moist and sticky BUT I didn't do as Mary instructed and leave the cake wrapped up for a week before eating so that may have something to do with it!

I also baked the cake in a smaller tin than the recipe stated and think I should have took it out of the oven sooner, so it was probably overbaked.

For these reasons I will give the recipe a chance and bake the parkin again next year, and next time I'll use the correct sized tin AND bake it a week before bonfire night to let the cake become moist and sticky!

Tuesday 1 October 2013

Pear and Almond cake with Streusel Topping

I had a rare day at home today with boy no.1 as his school were on strike. Boy no. 2 was at nursery so I saw this as the perfect opportunity to do some baking.

We were away visiting family at the weekend and were very kindly given 3 carrier bags full of freshly picked pears.

I was keen to bake with the pears and flicked through my latest cook book, Delia's Cakes. I came across this recipe and decided to give this a go.

The cake is very simple to bake. The cake itself is made using self raising flour, baking powder, butter, golden caster sugar, ground almonds, an egg, almond extract, pinch of salt and 3 tablespoons milk.

Once combined using an electric whisk, you simply spoon the batter into a lined 20cm cake tin, level the top with a tablespoon, and add 2 peeled, cored and sliced pears on top.

The instructions were a bit ambiguous, Delia instructs you to arrange the pears in a circle on top and states that a few can go in the middle. I was unsure what she meant by this, and simply placed the pear slices going from the middle to the edge all the way round. It's a bit hard to explain but it looked good when finished.

The streusel topping was the final step, which is made using self raising flour, demerara sugar, melted butter and flaked almonds which you sprinkle over the top of the pears.

The cake was baked for 45 mins (we popped out to pick up boy no. 2 from nursery whilst the cake was in the oven!) and left to cool.

A good tip from Delia is to use a palette knife to remove the baking parchment from the cake before sliding onto a wire rack to cool. I don't actually own a palette knife so used a long knife and this worked just as well.

The cake was delicious, we sprinkled it with icing sugar and served it with raspberry flavoured clotted cream ice cream. Yum.

Sunday 23 June 2013

Strawberry and mint mojitos by Lorraine Pascale

So we were away celebrating our wedding anniversary, and picked out this cocktail from Lorraine's book to make and enjoy whilst the boys were in bed.  


The ingredients were demerara sugar, limes, strawberries, fresh mint, crushed ice, white rum and soda water. 


They were delicious, but as you can see, the wine glasses weren't quite big enough!  I would recommend a straw or cocktail stirrer (as Lorraine advises, but we didn't have either of these in our holiday cottage!) so that you can mix everything together before sipping.  Yum yum. 

I particularly liked the combination of fresh lime juice and demerara sugar which you bash together with the end of a rolling pin in the glass before you start.  Sounds odd, but it is so lovely when combined with all of the other ingredients!

Apple tarte tatin by Mary Berry

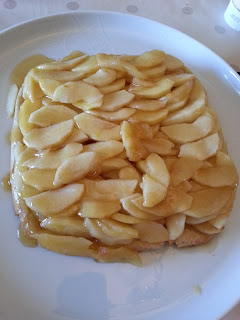
I liked the sound of this dessert very much, but I'm not sure I'd eaten it before, so I wasn't sure what it should taste like! For me the pastry was a real winner, crunchy, golden brown, light and flaky, sweetened with the caramel apple sauce.  Absolutely gorgeous and so easy to make too.


The apples were deliciously sweet and soft but my only complaint about this dessert was that the apples were not caramelised, rather they seemed to have steamed in the juices.  They were delicious, but I was expecting a bit of sticky caramelisation.  Maybe with a tweak I will get this next time!


This apple tarte tatin was delicious served hot with vanilla ice cream and with some of the juices spooned over it.  I can't wait to bake this again!


Cappuccino cakes

I got the inspiration for these cappuccino cakes from Lorraine Pascale's mini strawberries and cream cakes recipe.  Again I wanted to keep the cakes small so I used fairy cake cases and Mary Berry's chocolate fairy cake recipe.


I must admit to watching Eric Lanlard's baking programme and picking up a tip from the master baker himself - piping the cake batter into the cake cases!  Totally unnecessary of course, as the cake batter spreads and finds its own level in the heat of the oven, but soo much fun, I will definitely do this again.


The filling and topping was simply double cream sweetened with a little icing sugar, and 1tsp instant coffee granules (I used Nescafe Gold Blend as this is what we buy for visitors, we don't usually drink coffee!) dissolved in a little hot water. 


I sliced each cake in half, filled one half of each with a little coffee cream, and sandwiched the two layers back together.  For the topping I simply piped a little coffee cream onto the top of each cake before adding a square of my favourite chocolate, Galaxy cookie crumble.


These little cakes went down well, I would bake these again for something a little different yet delicious.


Sunday 19 May 2013

Madeira cake by Mary Berry - 20/4/13

 
This is the first bake in Mary Berry's Baking Bible, and one that I had put off for a while as Mary describes the sponge as "rich and densely textured" and for this reason it didn't really appeal.  However, I was going to visit my family and wanted to bake them a cake, one that travelled well as I was travelling on the train, so I thought this cake was ideal. 

The cake batter followed the "all in one" method and was very easy to mix together.  I particularly enjoyed grating the zest of one lemon into the mixing bowl, it had such a fresh citrussy scent! 

The cake had a good buttery lemony flavour but the texture was dense, as the recipe says, and it was a little on the dry side.  Unfortunately, the cake didn't seem to go down too well with my family (now there's a first!) and I ended up bringing a lot of it home with me!

However, we found this cake definitely improved with age, and we ended up polishing it off with great enjoyment.  Husband particularly enjoyed this cake and said it was good, which was surprising as he usually likes a good topping on his cake to counteract any dryness.

I would bake this cake again, but next time I will remember to bake it at least a couple of days in advance, to allow the cake to mature and become moist.


Friday 17 May 2013

Muesli Cookies by Mary Berry - 19/4/13


I liked the sound of these muesli cookies.  Mary says that the flavour and consistency will depend on the muesli used.  I used our usual muesli, no added sugar Alpen.  They were very easy to make and totally delicious!  Boy No. 1 helped me bake these, as usual.  We weighed most of the ingredients - 175g soft butter, 100g caster sugar, 1 large egg, and 175g self raising flour - into our second-to largest mixing bowl and beat all of these together with the electric whisk until smooth.  The mixture was fairly stiff and most of the dough stuck to the beaters!


Having removed the cookie dough from the beaters and after putting the excess dough back into the mixing bowl, we then added 175g no added sugar Alpen and mixed this in, using a wooden spoon this time!


We then spooned 28 (large) teaspoonfuls of the mixture on to three pre-prepared baking trays, and this is where Boy No. 1 got busy, sprinkling extra muesli and a little demerara sugar onto the top of each cookie.

Mary's recipe does say to leave room for the cookies to spread.  As can be seen above, we did do this, and as we fully expected the cookies to spread, we didn't bother pressing down on the top of each cookie.However, when they came out of the oven, they had barely spread at all, and looked a little rustic!

Despite their appearance, these little cookies were tasty and delicious, and the extra muesli and sprinkling of demerara sugar on the top provided a welcome sweetness.  Both boys enjoyed these, and they were quickly devoured by all of the family!  I found that one (or two) were particularly good with a nice cup of tea.


Thursday 16 May 2013

Mini strawberries and cream cakes by Lorraine Pascale - 14/4/13

I had treated myself to Lorraine Pascale's latest book a couple of weeks before baking these delicious cakes and this was the first recipe that caught my eye!  The thought of delicious vanilla sponge cakes, filled with a dollop of double cream and strawberry jam, topped with a strawberry and drizzled with melted white chocolate was just too tempting to resist. 
 
For the sponge cakes, I have to admit I didn't follow Lorraine's recipe as I thought the quantities were quite large and I wanted to keep these cakes "fairy cake" size rather than the larger cup cake size.  So I turned to my trusty Mary Berry's Baking Bible and instead followed Mary's standard fairy cake recipe, adding some good quality vanilla extract to the cake batter.


Lorraine suggests you can make an optional sugar syrup for pouring over the split sponge cakes once they have been baked and split, I decided against this as I thought the cakes would be sweet enough.


For the cream filling and topping, Lorraine instructs you to add vanilla extract and sifted icing sugar to the double cream before whipping.  I was very pleased with the taste of the cream and the texture of the sweet cream was perfect - no over-whipping the cream this time!


I loved the results of this recipe, and so did my family!  This is definitely a recipe that I will be coming back to again and again.


Wednesday 15 May 2013

Chocolate Swiss Roll by Mary Berry - 12/4/13

I was looking forward to baking this chocolate swiss roll, especially after the success of the plain swiss roll!  Myself and Boy No. 1 baked this for our pudding whilst Boy No. 2 was napping in bed.  We used strawberry jam - instead of the blackberry jam referred to in the recipe - and it was fine.
 
I did manage to overwhip the cream though, at the time of baking I had a lot of things on my mind, as will be seen at the end of this post.  Looking back, I don't know how I managed to bake this swiss roll at all to be honest, but I think I needed some distraction and focus, and baking this gorgeous fluffy chocolatey swiss roll provided me with this.
 
Despite the double cream being slightly overwhipped and more difficult to spread due to this, it still tasted really good.  The sponge had a lovely chocolatey flavour and the cream, jam and sponge worked so well together.


I baked this chocolate swiss roll in memory of my dear brother Andrew, who very sadly passed away on 10/4/13 aged just 30 years.  RIP Andrew, thinking of you always. xxx

Sunday 28 April 2013

Manchester tart - recipe by James Martin

My mum's favourite pudding is a Manchester Tart.  She told me it reminds her of her school days as it was often a pudding they would serve at school.  Mum was coming to stay with us for a few days, and I had already promised her I would bake her a cake/pudding of her choice for Mother's Day.  Mum was coming to look after Boy Number 1 during the Easter holidays, so it was a perfect time to bake her a Manchester Tart.
 
I trawled the internet for a recipe, and after much deliberation I decided on this recipe James Martin's Manchester Tart by James Martin.  I have always found James' recipes reliable and tasty and I'm also a Saturday Kitchen fan! 
 
I did adapt the recipe slightly.  Firstly, the recipe says to use ready made shortcrust pastry.  Being the glutton for punishment that I am, I decided to make my own.  I used the pastry recipe for Mary Berry's pecan pie from Mary's Baking Bible.  This is a pie that I have baked before, and I knew that the pastry recipe worked and would - hopefully - go well in this recipe!
 
Here is the baked pastry case.  I placed the loose bottomed flan tin containing the baked pastry case on top of an upturned glass and carefully loosened the ring and lowered it onto the worktop.  Luckily the pastry case stayed intact as I did so!
 

The next job was to fill the pastry case with raspberry jam and dessicated coconut.  I must admit I'm not a fan of coconut, but I hoped this recipe would convert me!


Next, James instructs you to sprinkle over 150g fresh raspberries.  This is where I diverted from the recipe a little, as mum told me that she liked fresh sliced banana in her tart!  So I decided to alternate circles of banana and fresh raspberries.


It was almost a shame that the fresh fruit was going to be covered up with the custard filling, as it looked quite tempting and pretty!


The next part of the recipe was to make the custard filling.  I absolutely adore custard, especially freshly made vanilla custard, and I was looking forward to this part very much! 

The making of the custard was very straightforward, and a quick taste test revealed that it was indeed very delicious!  The hot custard was transferred to a clean bowl and then (I was unsure about this bit) I dusted the top of the custard with 2tbsp icing sugar to prevent a skin forming and left it to cool.  This tip did seem to work, although the top of the custard cracked quite a bit and the top bit went quite watery so I don't know if I would do this again next time I make custard. 

Once the custard had cooled in the fridge it was time to whip up a large amount of double cream and mix this into the custard mixture.  I was also unsure about this part, as I'm not a huge fan of double cream and I didn't want to spoil the lovely custard mixture!  

The tart filling was then poured into the pastry case and I levelled this as best as I could.  It did taste lovely - and there was quite a bit left over too - bonus!


I had pre-toasted the remaining 3tbsp of the dessicated coconut in a dry frying pan and once this had cooled I sprinkled this over the top of the tart.  Mum had arrived by now and was looking forward to trying a slice!


To finish off the tart, I simply placed a little pile of raspberries into the centre of the tart and let it rest in the fridge until we were ready to eat it for pudding after our tea.


And the verdict?  It was good, but next time I make it I will probably leave out the double cream, as I really don't think it needed it and I thought the cream diluted the lovely vanilla custard flavour.  I was also a little disappointed as the tart didn't set as I expected (see picture below) and, as you can see, it was a bit sloppy.  I think this may be because I may have under-whipped the cream.  My homemade pastry was also a little disappointing, it was quite hard and difficult to cut through - perhaps I rollled the pastry a little too thin?

Having said all of the above, my mum said she loved this tart and said it was extra special.  This was evidenced as husband and I went out for dinner the next night, came home and a very large portion had mysteriously disappeared from the fridge!  The tart was also a hit with husband, who said that the filling was really good. 


This tart was quite time consuming to make, and although I was a little disappointed with the end result, my mum certainly wasn't, and that's all that matters, as this tart was made for her!

Thursday 28 March 2013

Simnel Cake by Mary Berry

This was another of Mary's recipes which I felt was perfect for baking at this timely time of year!

The recipe calls for a deep 20" cake tin.  I don't own one of these, but I do have two 20" shallow sandwich tins, which after much deliberation I decided would have to do (well, one of them would have to do anyway).

To compensate, I made sure that I lined the sides of the tin with an extra tall layer of baking parchment, so if the cake mixture rose too much, hopefully the parchment would contain it and hold it in place!


This is an all in one recipe, which means that you put all of the ingredients into a bowl and mix them together until a batter is formed.  The recipe doesn't say to do this but I assumed that you were meant to mix together the cake ingredients first (flour, light muscovado sugar, butter and eggs) before adding the fruit and spices.  This is what I did anyway and it worked a treat.

I was getting increasingly nervous as I added the various types of fruit to my batter, as my mixing bowl was getting fuller and fuller and my lined tin seemed to be shrinking before my eyes!

I needn't have worried.  As instructed I placed approximately half of the cake and fruit mixture into the tin, before levelling and adding a layer of marzipan.  I then added the rest of the cake mixture and levelled the top again before baking for 2 and a half hours!


I was very pleased with the finished baked fruit cake, and thought it looked good enough to eat as it was, but I pressed on with the decoration using the rest of the marzipan!


I put the apricot jam on to warm in a pan while I rolled out the second disc of marzipan and weighed out the marzipan balls.  I got a bit carried away with making sure each ball weighed exactly 14g (yes, I know, I need to get a life!) and completely forgot about the jam which was warming merrily away in the pan.  I managed to remove it from the heat just befor it started to burn!

The jam was spread on top of the cake before the disc of marzipan was gently placed on top.  This layer of jam apparently helps the marzipan to stick to the cake.

The top of the marzipan was then scored using a sharp knife, brushed lightly with beaten egg and the 11 balls (representing the 11 apostles less Judas) were placed on top.  I was impressed with how well they stuck to the cake, I had visions of them simply rolling off!


Finally, the whole cake was placed under a hot grill to brown.  I wished I had thought about putting the cake onto a baking tray before I had decorated it, as it was still on the wire rack, but luckily I managed to transfer it onto a tray without any disasters.  Phew!!
 

I was pleased overall with how the cake turned out.  I was a bit cross that I hadn't allowed some overlap for the top layer of marzipan on top of the cake, as my attempts to crimp the edges were pretty dismal, given that there wasn't enough marzipan to work with!  I guess this sort of thing comes from practice and experience.


Taste wise, the cake was delicious.  I have to admit that I did feel a little sick from the marzipan after eating a small slice of this cake, but I think this has more to do with me eating all the offcuts that were left over from cutting around the marzipan discs and the marzipan balls!

Husband was pleased with the cake too.  The boys haven't had the chance to try it yet but I'm sure they soon will, that is, if they can manage to fit it in around the chocolate easter eggs, fish and chips and hot cross buns!

Happy Easter everybody!

Hot Cross Buns by Mary Berry

I have to admit, I'm not a fan of hot cross buns.  There's something about the smell of them that has put me off in the past.  Husband really likes them though and we normally buy a packet from Sainsbury's at Easter each year.  He normally ends up scoffing the lot, as I really don't like them!

However, having seen the recipe for these buns in Mary's Baking Bible, in the run up to Easter I decided to have a go and see if these home baked buns would change my mind.

The recipe generally went to plan, although I felt the dough was not quite soft enough and the fruit kept falling out as I tried to knead the dough!

As this is an enriched dough it took longer to rise than a normal dough.  It didn't help that it was a very cold day (a thick layer of snow outside towards the end of March!) and my kitchen wasn't particularly warm!

Also, I admit that for the crosses, I favoured Paul Hollywood's recipe for the pastry/white paste (75g plain flour and water) rather than Mary's as I felt that the mixture really didn't need 25g butter!  The pastry/paste turned out fine and there was just enough paste to cover the 12 buns.


The buns looked a little rough before they went into the oven (I really need to perfect my kneading technique!) but I think they looked a bit better once baked.


I enjoyed brushing the sticky syrup made from warmed caster sugar and water (the recipe calls for granulated sugar but I didn't have any!) and this left a lovely glossy shine all over the buns.


Husband was impressed with the look and taste of the buns, although he did say the dough was a little dense - again, I think this is down to my poor kneading technique!


We enjoyed these buns after tea, straight from the oven, they were piping hot, we split them in half and smothered them in butter before devouring.

And am I converted?  A huge YES!  I thought these buns were absolutely delicious!  The smell of the buns was very nice, not the chemical, slightly burnt currant smell which I am so used to and which has put me off hot cross buns all these years!

A definite bake again for Easter 2014.  Looking forward to baking them again next year - hopefully my kneading technique will have improved by then!